
Here is the post we promised that is linked to the previous brake job. The brake job was on the same vehicle. First off the tools needed for this job are as follows:
- 3-ton floor jack
- 3-ton jack stands (Some people call them body jacks)
- a good set of metric sockets
- a 13/16th 1/2 dr-inch drive socket
- 24- inch long/ half-inch drive breaker bar (Unless you are fortunate enough to have an impact wrench)
- a can of liquid wrench or WD-40
- a good pair of wire cutters or pliers.
- an old wire coat hanger or even a rope
- a 36mm socket
- a good heavy sledgehammer or I used a 2LB sledge
- #2 flat bit screwdriver
- a door panel removal tool
- red loc-tite
- a good solid wire brush
- shop towels
- A good pair of wheel chocks or some wood pieces to block your wheels
Now we can start this job. Put your floor jack under the lower A-arm and lift it just a little taking only a small amount of weight off the wheel so you may loosen your lug nuts with your socket and a breaker bar. Once you have this done you can finish lifting the truck and put your jack stand in place. Then place your wheelchocks or a couple of pieces of wood on your tires.

jack placement is very important with any job when a vehicle has to be raised.

body jack or jack stand placement is vital.
Make sure it is in a good solid spot on the frame of your vehicle so if the floor jack does go down even a little bit the jack stand would have the full weight of it. Finish removing the tire, set it aside, and then go ahead and start to remove the brake caliper and brake pads.

The socket is 15mm on a 3/8th drive ratchet with an extra-long handle for breaking leverage.

The brake Caliper hung with care to not twist the cable with a wire coat hanger a rope will work too.

pay close attention to your cable here. it can never be twisted on re-installation.
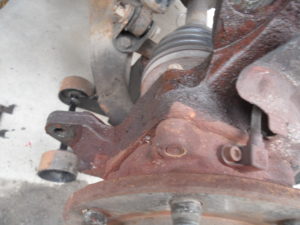
Now you can move onto the brake caliper mounting frame. If you are lucky enough to have an impact wrench you can use it here on these two bolts on this frame otherwise you’ll have to use a breaker bar as I did. Not only to break the rust off these bolts but I had to do throughout the whole removal of each bolt because it had never been removed before to my knowledge or to this depth So be prepared muscle-wise for this job.

brake caliper bolts are extra tight here.

The breaker bar is used throughout the removal of these stubborn bolts. Oh and btw I’m standing here and lifting with my knees to loosen these bolts.

These bolts were tight. Hub bolts
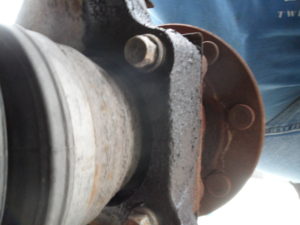
the rear view of the project & bolts to our hub assembly

Some rust here.
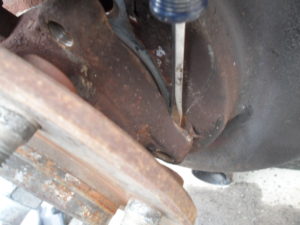
Working around the hub with my small screwdriver or chisel & hammer?
Removing the hub assembly! Here’s the proper location for our ABS speed cable.

These 2 bolts size is 13/16ths. I used my 24-inch long breaker bar throughout the whole removal process.

Even a ‘ liquid wrench’ didn’t help this beast!

It’s coming out slowly but still stubborn.
Getting the mounting bolts and frame out of your way, you can begin to remove the disc-brake rotor. In the pictures, you will see the original lock rings are still on the lugs from the factory and you can remove these with your wire cutters. If you want to use these again you can get them started on the threads away from the rotors then continue spinning them off the lug studs with a good pair of gloves.

Removal of the Rotors First we take off the lock rings from the factory and there are 2 of these.

Remove these to take the rotor off then your hub assembly is next.
Once you have those out of the way the rotor comes off with ease. Now you get to remove the hub cover and then the nut in the center of the hub from the CV-axle. As you know I don’t have an impact to break this axle nut so I got everything out of the way and re-installed my tire on the hub and installed only two lug nuts to hold the wheel on, then I lowered it with the floor jack but I remove your body jack so I could lower my truck. So some of the weight of the truck will be on that one tire because I only need a little bit to get it started. Once I have it out I can take it off my hand. Then I raised the floor jack again and put my body jack in under the truck in a safe spot. And removed the lug nuts and tire then all I had to do was finish removing the hub nut and go onto the 4 bolts from the backside of the steering knuckle that holds the hub on it.

The axle nut removal. I first reinstalled the tire with 2 lug nuts.

36mm socket used here on a 1-inch drive breaker bar

A 36mm socket is used here on a 1-inch drive breaker bar to loosen this nut.


Axle Nut is now loosened to the point I can take it off by hand
Once you have the 4 bolts out far enough you can tap on the CV-axle nut in the middle of the hub (leave the axle nut on and do not take it completely off) keeping the nut on the CV-axle so there isn’t any damage to the treads combined with a sledgehammer to loosen the axle from the hub. Doing this, also helped loosen the hub from the steering knuckle too

CV-Axle Nut is left on the axle so I could use it as a striking point for my hammer to loosen the axle from the hub.

brake cable lines need to be straight always!!!

CV-axle is out and so is the hub now to clean the dust plate and the splines of our CV-axle and your shop towels to wipe up any debris
Now on to the re-installation of our brand new hub assembly! Before re-installing the new hub clean up the rust on the axle splines. The dust plate too. Use the wire brush for this. Wipe out the center with a shop towel to remove any debris so the hub will sit in it perfectly. Clean up the bolts for the axle hub. This will make it easier for you to reinstall your axle hub.

For the NEW Hub assembly first check it over making sure everything is looking okay before your re-installation and take note of the ABS speed cable it needs to be placed right!
Once they’re cleaned and ready to go back in, don’t forget the red loc-tite. You don’t need much just a little on one side of the bolt threads then insert. Then do this 3 more times for the hub, Then twice for the brake caliper mounting frame. Once they are in you can move to the axle nut and once again use your red loc-tite here. And just as I did to remove the nut you can do the same thing tighten it down.

Brake caliper frame mounting bolts I need to clean before I put them back in. I use a drill attached wire wheel.

A small amount of red loc-tite is all you need not more is needed for this for the hub assembly.

CV-axle spline threads are another place to use red loc-tite. then install your axle nut.

This is our “NEW HUB” and we are getting close to being done with our hub repair job.

Rotor re-installed
finished job!

Ending this job by re-tightening the axle nut by using your tire & 2 lug nuts. Leaving the weight of the vehicle on the jack. Not on the tire!

All tighten down with our 1-inch breaker bar and the 36mm socket. And elbow grease. LOL!
Then you can install your rotor ( be sure how your ABS cable is routed with the dust plate because it only goes in ONE WAY) your lock washers, the brake caliper mounting frame, then your brake pads, then the brake caliper, and pay close attention to how the ribbed lines on the brake line are going they MUST be STRAIGHT never twisted or else you’ll have brake failure if not done correctly.
Get ready to take it out for a brake test and what we’re hoping for is complete silence out of the front end.
But the bearings WERE shot in this wheel hub!


